

How To Paint Oak Cabinets White
Painting our oak cabinets white is 1 of the nearly worthwhile DIY projects I take e'er tackled. Seriously, ane of the very best.
It certainly isn't the flashiest project I have done and it wasn't the fastest by a long shot. But the departure this ane elementary step has fabricated in our home is unbelievable.
When I was deciding what procedure to use to pigment my kitchen cabinets, I was focused on two things:
- I wanted really beautiful, professional looking results.
- And I wanted information technology to be as quick and painless as possible. In that order.
I've seen lots of tutorials for painting your cabinets the absolute fastest, easiest way possible and while I am all for that, I am a total perfectionist at heart. I knew I wouldn't be happy with anything less than a perfect paint chore and I wasn't willing to salvage time if it meant less than perfect results.
And yep, that meant doing extra piece of work to eliminate that oak wood grain. Merely even with my high expectations, I was able to eliminate a few steps past using the right pigment and materials.
*Update: I've gotten tons of questions nearly how my painted cabinets accept held up now that it has been over 2 and a half years since I painted them. I put together a full post sharing all of the details of how my painted oak cabinets expect now along with plenty of pics correct here . I would definitely recommend checking it out before tackling your ain painted cabinets.*
This post contains chapter links which means if y'all make a purchase afterwards clicking a link I volition earn a minor commission only it won't cost you a penny more. Click here to see my full disclosure policy.

Okay, before I get into all the how-to stuff, let me take a moment to talk about oak cabinets and the wood grain debate.
Oak cabinets accept the special distinction of having a very prominent wood grain. Most pine, maple, cherry etc. forest cabinets don't take this extra result.
I am not just talking almost the fact the cabinets look similar woods, this grain is etched deep into the face of the cabinets. When you paint oak cabinets white, the grain texture remains very apparent.
This doesn't carp some people ane bit. Only every bit I said, I'm a full perfectionist and it bothers me. Instead of fresh classic white cabinets, to me, they await like dated oak cabinets that are trying to hide backside white paint.
So there was no question I had to accept care of the wood grain earlier I could really first painting. This was past far the most fourth dimension-intensive part of the whole projection, but the final finish on my cabinets is flawless so it was totally worth it.
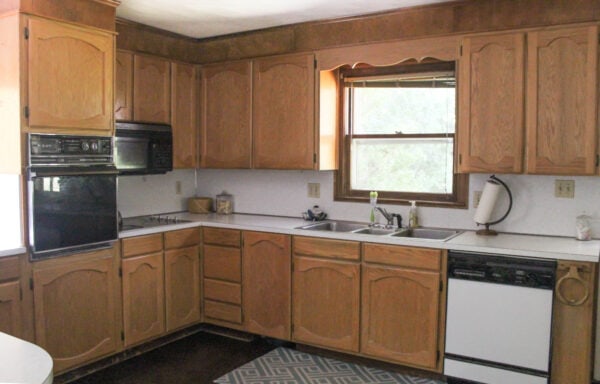
Hither'due south a wait at how my cabinets looked before painting. They were definitely in demand of some help!
Materials for Painting Kitchen Cabinets White
- cleaner – I love KrudKutter PrePaint Cleaner for this. My other favorite cleaner is Dawn dish soap diluted with water in a spray bottle.
- painter's tape – if needed to protect adjoining surfaces
- DecoArt stain blocker or Zinsser Oil-Based Primer – either of these will work for sealing the wood then that wood tannins don't bleed through your paint and cause yellowing
- Spackling
- Small putty pocketknife
- 320 grit sandpaper
- high quality paintbrush – These are my favorite paintbrushes for getting a smoothen finish on cabinets and furniture.
- pocket-size foam pigment roller
- A high quality pigment – I used DecoArt Satin Enamels paint in Pure White to paint my cabinets and it worked really well. Another cracking pigment that I recommend for painting cabinets is General Finishes Milk Paint .
Painting Oak Cabinets White
Stride 1: Remove the doors
Before you tin can really get started at all, y'all have to remove all of the cabinet doors and drawers.
Be sure to characterization each door as y'all remove information technology then you volition know exactly where it goes. If yous are reusing your hinges, be sure to label them as well.
I simply labeled a small baggie and stuck all of my hinges and screws in the baggie. This is important considering even though cabinet doors may look the aforementioned, if they are put back in the incorrect spot, they will not fit correctly.
(Trust me. I have a friend that did this and their cabinets that they worked so difficult to paint looked atrocious because the doors were all misaligned.)
Stride 2: Clean the cabinets
As with near painting projects, preparing the surface for paint takes the majority of the time. But if you desire your pigment to final, it is vital.
Earlier doing annihilation else, your cabinets demand to exist very, very clean. Even though they expect clean, cooking grease builds up over the years and paint virtually definitely does not like to stick to grease.
A lot of people use TSP to degrease their cabinets, but I read a tip that Dawn dish lather works just besides. And since I swear by Dawn for cleaning just about annihilation, that is what I went with.
I wiped my cabinets down with soapy water and and so wiped them with a clean rag to remove whatever soapy residue.
I followed this upward with DecoArt stain blocker. This helps with making sure any lingering grease and grime is sealed away, but more importantly, it keeps wood tannins from ruining your paint job.
Have y'all ever painted a piece of wood furniture white simply to discover the woods color seeping through your fresh white paint? These are woods tannins seeping through.
The first time I was painting a piece of article of furniture and this happened, I tried to embrace it up with more and more than layers of paint. This was a big mistake and did non work.
What I didn't know is that certain dark woods and red-toned woods have to be sealed before painting or the tannins will continue to leak through your paint no matter how many coats you add.
You can also reach the aforementioned this with a good oil-based primer – I'g a large fan of Zinsser oil-based primer .
If you cull to use primer rather than the stain sealer, I would wait to practice it after the next step – spackling the wood grain.
(And if y'all want more info on using oil-based primers with water-based paints, I accept a weblog post that breaks down everything you demand to know almost primer .)
Footstep iii: Deal with the forest grain
I did a lot of inquiry and a bit of experimentation on the best style to bargain with the oak wood grain.
The clear consensus was that spackle is the best way to eliminate woods grain. Yes, I'm talking most the same spackle you lot use to patch nail holes in drywall.
Apply a flexible putty knife to utilise a very, very thin layer of spackling over the surface of your cabinets. Give it a few minutes to dry out and and then sand all of the backlog off using a very high grit sandpaper. (I got the best results from 320 grit.)
Once information technology is sanded, the spackle will only be left in the trivial crevices of the wood grain, leaving them smooth with the surface of the wood. When everything is sanded smooth, use a microfiber fabric to remove the sanding dust. Practice not use a moisture cloth, as the water will pull the spackle out of the wood!

Personally, while I did paint the inside of my cabinet doors, I did not spackle them. I only did this pace on the well-nigh prominent areas – the drawer fronts, cabinet doors, and cabinet boxes.
Considering of this, information technology is really piece of cake to see the deviation between filling the woods grain and skipping it. Here are a few pictures that show how the wood grain looks painted to help you make up one's mind if it is something yous desire to worry about or non.


Pace four: Paint
And finally, the concluding step is to actually paint.
I used a foam roller meant for painting shine surfaces to pigment the flat areas and I used these paintbrushes for getting into smaller areas.
After hundreds of painting projects, I've learned that the paintbrush y'all employ matters. A lot.
I've turned into a flake of a paintbrush snob, so when I saw these DecoArt paintbrushes I wasn't even planning to utilise them at starting time. But I decided to give them a try, and I am so glad I did. The bristles are extra soft and are perfect for getting a very smoothen finish. I volition definitely be using these again in the future.
Okay, so here is the secret to getting an incredibly smooth finish on your cabinets without using a paint sprayer.
Foam rollers are great at giving a pretty shine surface, but in my experience they tend to leave a chip of a speckled surface. The color is compatible, merely the texture is like to the surface of a football with tiny raised bubbles from the roller.
This isn't always a big deal, but I was going for perfection. I wanted cabinets that looked professional.
I painted the cabinets using the roller every bit usual. So earlier the last glaze of paint, I gently sanded everything using my 320 grit sandpaper again. This made the cabinet surface silky smooth.
Then I brushed on the last coat of pigment using my super soft paintbrushes.
Yes, this added more than time to the procedure even so again. But the cabinets look and felt amazingly smooth and beautiful.
And the best part? No top glaze is needed. DecoArt satin enamels is an enamel paint which means it dries to a very difficult finish. Which ways you don't need to put anything over information technology for protection similar other softer paints.
I was able to reattach my chiffonier doors the same solar day I finished painting them, though I did try to exist actress gentle with them for a few weeks but in case.

Equally y'all can see, we also finally removed that lilliputian flourish in a higher place the sink. Good riddance!

It is absolutely unbelievable what a difference painting our kitchen cabinets white made. Yes, it is fourth dimension consuming. Yep, it is a pain to accept your kitchen in chaos. But it is and so very, very worth it in the end.
Even if nosotros didn't change anything else – not the gold speckled laminate countertops, not the appliances from the 80s, cypher – painting the cabinets alone makes information technology feel like an entirely new kitchen. I know that sounds crazy, but I am completely serious.
And now with a few other budget DIY projects, our entire kitchen is transformed!
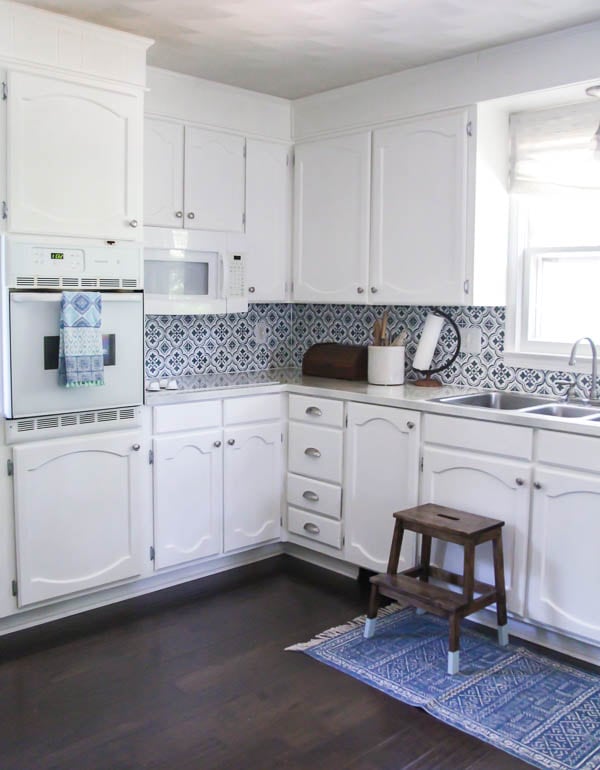
Have a look at this before and after – at present that is a serious update!

I also recently painted my oak bathroom cabinets using more often than not the same method but a different type of paint that I like fifty-fifty more. I recommend heading over there next if you are because tackling this project.
Instructions
- Remove the cabinet doors and drawers. Label each door, drawer, and hinge every bit you lot remove them so you can easily put them back where they go. Yous can place the hinges and hardware for each door in a labeled plastic bag.
- Make clean your cabinet boxes, doors, and drawers well to remove any dust and grease.
- Paint a coat of DecoArt Stain Blocker onto all of the bare forest surfaces. This will prevent the tannins in the woods from bleeding through your fresh paint and causing yellowing. (Or if you adopt, yous can use an oil-based primer instead, but if yous cull to utilise a primer, you will utilise it afterward the next step.)
- To polish the heavy oak wood grain, apply a putty pocketknife to apply a very sparse layer of spackle onto your cabinets. In one case the spackling has dried, sand it smooth with 320 grit sandpaper.
- If you are using primer instead of the Stain Blocker, apply it using a smooth cream paint roller.
- Employ a foam roller to paint your cabinet doors, drawer fronts, and cabinet boxes. You can utilise a paintbrush to pigment smaller areas the roller can't attain. You will need at least two coats of paint, maybe more if you lot are painting with pure white paint.
- To go a very smooth pigment finish on your cabinets, sand each flat surface with 320 dust sandpaper before painting your final coat of paint. So castor on the final coat of paint rather than using the roller.
- Once your cabinets are completely dry out, carefully reattach the cabinet doors, drawers, and hardware. Be actress gentle with your painted cabinets for the start few weeks until the paint is fully hardened.
More Upkeep Kitchen Makeover Inspiration
Exist sure to head over and see the update on how our painted cabinets are holding upwards two years afterwards equally well as our last kitchen makeover reveal. We transformed our entire kitchen on a tiny budget with painted cabinets, painted countertops, a stenciled backsplash, and lots of other budget DIYs.
More than budget kitchen DIY projects to check out:
- 15 Amazing ways to redo kitchen cabinets
- 21 of the Best Budget Kitchen Makeovers nether $yard
- Stenciled Kitchen Backsplash
- Painted Countertops: How to paint your countertops to expect like marble
- Where to buy inexpensive cabinet knobs and pulls
I'd love for you to pin this post on Pinterest!

Google Web Story: Painting Oak Cabinets White

Source: https://www.lovelyetc.com/painting-oak-kitchen-cabinets-white/
Posted by: tindalprobjecre.blogspot.com
0 Response to "How To Paint Oak Cabinets White"
Post a Comment